Step 1: Download the Remix OS 2.0 and USB Installer.
The Remix OS 2.0 is officially going to be released on 12th January but we spotted a leaked Remix OS 2.0 (which might be the final build) available for download & with it accompanies a Remix USB installer to install the Remix OS 2.0 on the USB Drive.
This link has the files which can be downloaded using Free Download Manager or any other Torrent Client and can’t be downloaded using the Download manager in any browser. So if you don’t have torrent client on your PC, Download uTorrent and Install it before downloading this.
Step 2: Format the USB Drive and Change the Format to FAT32.
Once you’ve successfully downloaded the Remix OS 2.0 and the USB Tool from the above link, format the USB Drive and change the format of the USB Drive to FAT32. This will make the USB empty and in the format which the Remix OS requires.
Disclaimer: Before formatting take the important data’s backup to the HDD so that you don’t lose any important data stored in the USB Drive.
Step 3: Start the Remix OS USB Tool.
The Remix OS Torrent file which you’ve downloaded from the above link doesn’t just have the OS, but it also has a USB Tool. So this tool flashes the OS to the USB drive and make the USB Bootloader.

After starting the tool, you will have to select the ISO file and the drive where you want to install the ISO File. You might think of extracting the ISO file directly to the USB, but that won’t help because this tool also makes the USB bootable.
Step 4: Add the ISO File to the USB Tool & Select the USB Disk on which you will be Installing the Remix OS.
So the Remix OS USB tool has two fields, in one field you are supposed to add the path of the ISO File on your computer system & select the USB disk on which this tool will install the OS.
 Select the ISO file of the Remix OS which you’ve downloaded from the Step 1 and the USB Disk where you want to install the Remix OS 2.0. Once done, The Remix OS USB tool will begin it’s working, It will start copying files & writing the Bootloader to the USB Drive.
This process might take time, depending on the read and write speed of your computer system, It is recommended to stop doing other tasks while these files are being copied, because on slow computer systems, you might notice lags. Once it is completed, go ahead and follow the next step.
Step 5: Reboot your Computer System & Follow the instructions.
Depending on your BIOS, the Boot menu keys are different, so make a Google search “Laptop Brand Model Shortcut for Boot Menu” for the Key combinations to get into the Boot menu during the start.
Now Power on your computer system and press the key combinations to see the Boot menu and you will see a list of devices from which you can boot, You will have to select your USB Drive.

Select the USB Drive which has the “Remix OS 2.0 Installed in it”. Once done, it will boot up and you will see a blue screen showing two ways of using it i.e. Guest mode and Resident Mode. But in case you aren’t able to boot up and your existing Windows OS gets booted then you will have to change your BIOS Boot mode to Legacy and Follow the steps listed above again.

If you’ve seen this blue screen then you are on the right path and you will soon see the Remix working on your Computer System or Laptop.
Step 6: Select the Mode of Installation – Guest Mode or Resident Mode.
The Remix OS 2.0 has two modes of installation, you can use “Guest mode” or “Resident mode”. Guest mode is for the one’s who are willing to test it and are not sure about using the OS again. It won’t store any of your tasks, data nor the app installations. Once you reboot you will lose all the data.

The Resident mode will format the USB which has the live CD on it, But it will save all the details and changes you make to the Remix OS. That’s the reason why it takes 5-15 minutes based on the “System Configuration” and once getting into Resident mode you won’t have to install the Remix OS again and again!
Step 7: Remix OS 2.0 – Begin with Installing the OS.
Now the Remix OS 2.0 is installed, The boot screen with “Remix OS” written on confirms the installation. However, You are just three steps away to start the Remix OS 2.0’s GUI.
1st Step: Selecting the Language for operation:

The Remix OS 2.0 comes with different Languages pre-installed in it, selecting the language will be make the OS run in that particular language. So once you’ve booted into the Remix OS 2.0, the first thing you will see is selecting the language.
2nd Step: Agree to the User Agreement.

Once you’ve selected the language, The User agreement will appear, Depending on the language you’ve selected – the user agreement will appear in that language. I’ve selected English US as the language for operations. Clicking on the Next button will bring you closer to the Last step to see the working Remix OS 2.0 on your Laptop.
3rd Step – Click on Start.
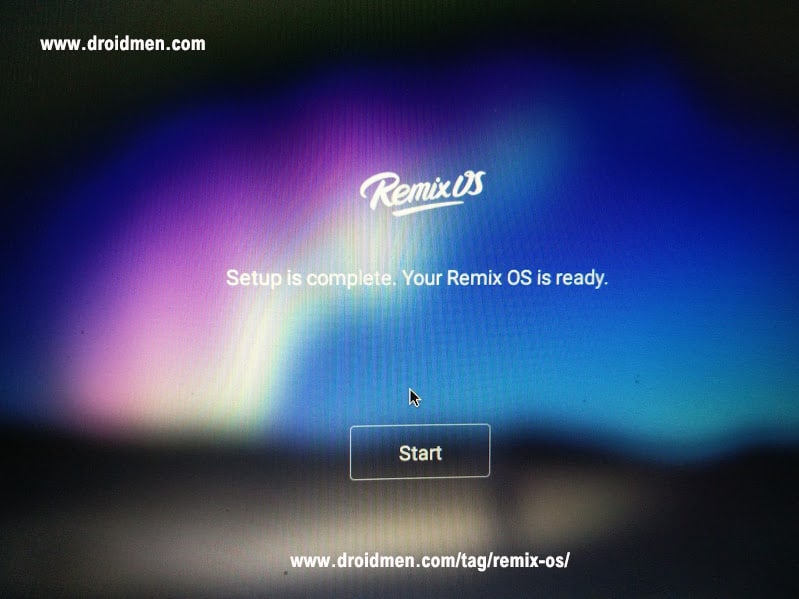
Yes, I agree that this is the most easiest step to do, You just have to click on “Start” and you will see the Remix OS 2.0 Live. I know this is the dumbest step, but we couldn’t avoid it. That’s it once done, you will see the Remix OS 2.0 operating live on your computer system.

Now, you’ve successfully installed the Remix OS 2.0 on your Computer system, Now its time to play around with the OS. Personally I used many apps such as Facebook, WordPress and Google Drive. Even the shortcuts such as Num Lock, Caps Lock, Number Keypad, ALT + Tab, ALT + F4 works fine on the Remix OS 2.0, I didn’t feel that I left Windows 10 OS while using this. Hope you enjoy using this. Faced any problems while installing? Post them here and I’ll solve that problem right away!